Features and Distances

Sometimes in geography it is necessary to know which objects are close to other objects. In MongoDB, one can select a feature which is near a certain point. From what I can gather, datatypes other than “Point” are not yet supported.

This is done in MongoDB by using the $near function which takes the parameters $geometry, $minDistance, and $maxDistance.

Say that we want to find all features in the ParisCollection collection which are between 1 and 5 kilometers of the Eiffel Tower, we would write the following query.

db.ParisCollection.find(
   {
     location:
       { $near :
          {
            $geometry: { type: "Point",  coordinates:[48.858532, 2.294395]},
            $minDistance: 1000,
            $maxDistance: 5000
          }
       }
   }
)

Here is a visual representation of what we are currently doing:

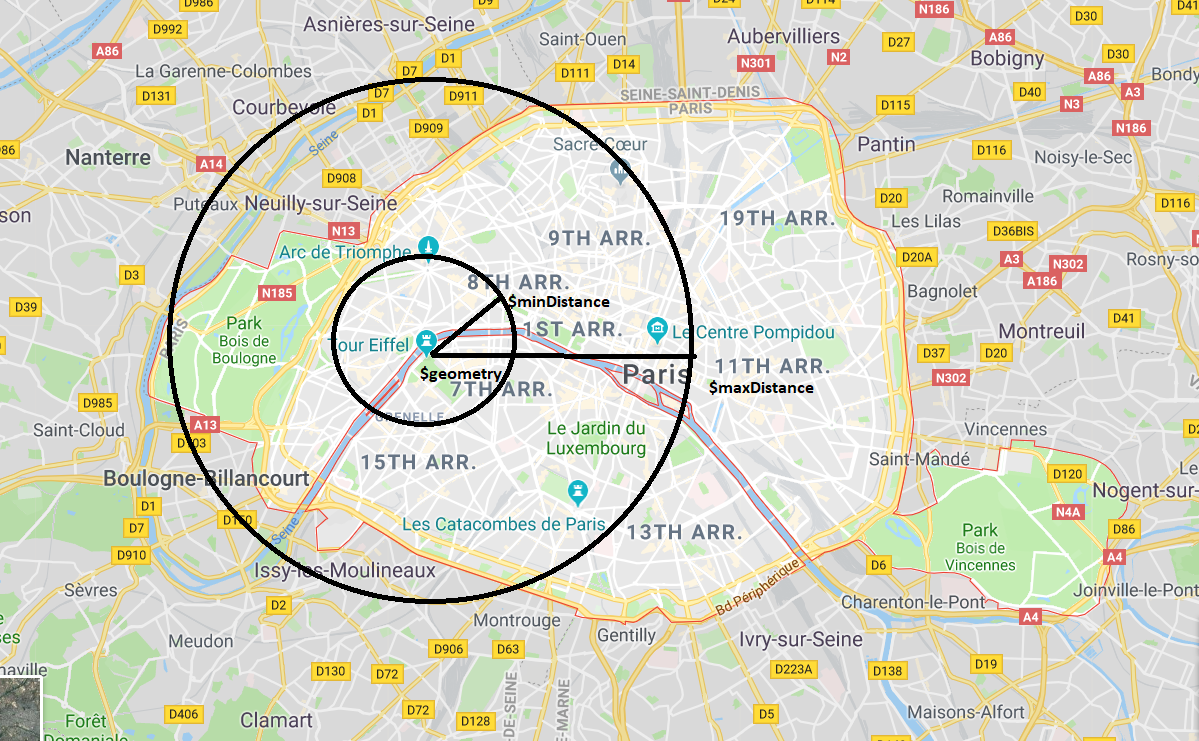
As you can see, the $geometry variable is a Point which coordinates are exactly where the Eiffel Tower is. $minDistance and $maxDistance variables specify two circles around the center point. Everything feature which exists in the ParisCollection and has a geometry which lies between these two distances will be returned by the above query.

Intersections

MongoDB allows one to find out which geographical features intersect with which other geographical features. MongoDB provides the function $geoIntersects which takes $geometry as a parameter in order to perform this intersection.

A common example would be finding out how many bridges cross one of the rivers in Paris. In order to complete the query, we need a $geometry which contains the coordinates of all the nodes or points which make up the river.

The query would then look as follows:

db.ParisCollection.find(
   {
     loc: {
       $geoIntersects: {
          $geometry: {
             type: "LineString" ,
             coordinates: [
               [ [ 0, 0 ], ... <all coordinates which make up the river> ]
             ]
          }
       }
     }
   }
)

This query would return every object in the ParisCollection collection which intersects with the specified LineString. These would be each bridge which crosses the river.

Finding Features in a given Bounding Box

MongoDB allows one to find certain geographical features, such as roads or restaurants, using a Bounding Box.

A Bounding What?

A bounding box is a rectangle which covers a geographical area. Suppose we have the following set of features. These could be lines or points or any geographical datatype supported by MongoDB.


The corresponding bounding box is the rectangle which makes sure that each of the features are within that box.

Bounding boxes are useful because one does not need to keep track of a polygon of data points which describe the box. One only needs to know two of the corner points, and one knows the entire construction of the box.

MongoDB Specific

MongoDB provides a simple function which can be used in geospatial queries called $box. This method allows one to define a box such as described above by specifying only the upper left and lower right corners of the box.

The following creates a bounding box in MongoDB which spans Paris. This is because of the two coordinates given. The first lat/lon is the upper left corner and the second is the lower right corner of the bounding box

{  
   $box:[  
      [  
         48.914114, 2.227600
      ],
      [  
         48.815299, 2.469160
      ]
   ]
}

The MongoDB $box is often used in conjunction with the command $geoWithin. This does exactly what you think it does. It returns a list of features which lies inside of the specified box.

So, continuing our example, the following query consults a collection named “FranceCollection” and finds each object/feature within this collection which is within the bounding box specified above.

db.FranceCollection.find( {  
   loc:{  
      $geoWithin:{  
         $box:[  
            [  
               48.914114,
               2.227600
            ],
            [  
               48.815299,
               2.469160
            ]
         }
      }
   }

And so one can clip features to lie only within a specific area and exclude features which lie outside that area.

Indexing

Indexing is a means by which a database management system sorts the data such that it is easier, and much faster, to find and work with.

MongoDB has a form of indexing which is specific to geo spatial information. This is called 2DSphere.

2DSphere: The Science

A 2DSphere index is used by MongoDB to organize spatial data in a meaningful manner.

According to the documentation, this index makes use of a C++ Google library to index geometrical data.

First there is a set of cells which are known beforehand cover the earth exactly. Secondly, to identify a certain geometry, a set of cells is selected which cover this geometry in all its fullness. This is called a “covering.”

https://www.mongodb.com/blog/post/new-geo-features-in-mongodb-24

Depending on the size of the geometry in question, a finer “granularity” can be used to define this covering. This means that one has a covering, but the cell sizes are smaller.

Furthermore these coverings are placed into bigger cells. This then forms a part of a normal B-Tree index which is used in many other indexing algorithms.

2DSphere: Practically

You can create this amazing index with the MongoDB compass program by going to the index tab and selecting create index. The type is 2dshpere and the property used is “geometry.”


On the other hand, if you prefer the command line, the following command does exactly the same thing, namely creating a 2dsphere index on the geography field of collection SomeCollection:

db.SomeCollection.ensureIndex({"geometry":"2dsphere"})

Simple Selections

MongDB queries look a bit different (okay a lot different) from its SQL counterpart. Where we once had standard SQL formats, datatypes, and ways of thinking, we now have a revolutionary way of doing things.

Firstly a database query is also a JSON string. This JSON string can be put into the find function of any collection:

db.SomeCollection.find()
// or 
db.SomeCollection.find({<some JSON query>})

The tricky part is finding out what goes inside the function. Let me explain with examples. Suppose we have the same two student objects in our SomeCollection collection:

    {
        student_number: 415324,
        name: "Susan",
        surname: "Strong",
        does_dancing: "yes",
        has_work_experience: "no"
    }

and

    {
        student_number: 9826421,
        name: "John",
        surname: "Smith",
        supervisor: "Prof Clev R. Guy",
        beers_per_day: 3
    }

If we wanted to do the equivalent of the old SQL:

SELECT * FROM SomeCollection;

Then the simple find would suffice:

db.SomeCollection.find()

This would return all the objects in the collection, which in our case is just the two students.

In order to find the student by name, which is done in SQL like this:

SELECT * FROM SomeCollection WHERE name = 'John';

We would use the JSON string together with the find() function in order to select only the second student:

db.SomeCollection.find({"name":"John"})

Loading Spatial Data

Now we are ready to import some spatial data into the database. There are many means and formats which one can use to import data into the database. We will be looking at converting well-know SHP files into GeoJSON and then importing the GeoJSON file into the database.

Download Spatial Data

In the even that you do not have data to work with yet, you can take a look at OpenStreetMap Data Extracts. OpenStreetMap is an open source version of Google Maps. It has geographical data from all over the world.

Navigate to any country and download the “.shp.zip ” file for that country.

Once the file is done downloading, Unzip it to get a list of strange looking files:

Convert to GeoJSON

The next step is to convert these files to a GeoJSON file. This is done by using the tool osg2osg:

ogr2ogr -f GeoJSON -t_srs crs:84 file_name.geojson file_name.shp
  • -f GeoJSON specifies the format which to convert the shape file to.
  • -t srs crs:84 ensures that the proper format is used to conver7the shape file
  • file_name.geojson is the file which should be created and can be named anything
  • file_name.shp is the name of the shape file which you have downloaded

Import Into MongoDB

After converting the shape file, there should be a name.geojson file in the same folder. This file is now ready to be uploaded/imported into the mongo Database. We do this by using the mongoimport tool which was downloaded together with all the tools when you downloaded the database.

The following command enters this geojson data into the database you created:

mongoimport --db SomeDatabase -c SomeCollection --file "file_name.geojson" --jsonArray
  • –db SomeDatabase specifies the database which will be created or used
  • -c SomeCollection creates or uses a collection by the name of “SomeCollection”
  • –file specifies the file which is already in the geojson format
  • –jsonArray means that the features are already in a json array []

Setup

We will now try to get our hands dirty with some practical examples. But first we have to set up the environment.

Install MongoDB

You can download the database server from their official download page. Once it has downloaded, you can click on the file to run it and follow the instructions.

The file installs two different things. The first is the database server.This is the program which works with the actual data and the actual JSON files. This is the software which does all the indexing and searching of data.

The second software which was installed is called MongoDB Compass. This is a “client” which is used to connect to the database and display the data which is within the database in a nice way.

When prompted to connect to a database, keep everything as it is, and just click on connect. The following screen should appear.

Creating Data

Now that you have everything installed, you can create your first database by clicking on the bottom left “+” sign.

Then enter the name of your database as well the first collection of objects and click create database.

Feel free to create databases, collections, and documents as you want. Play around to get the hang of it. See if you can create the two student records as shown in the previous page.

Design a site like this with WordPress.com
Get started